Red Cabbage pH Indicator
 Do you know which of the chemicals in your environment are acids and bases? One way to find out is to use a pH indicator. This is a chemical that reacts with acids to turn one colour and bases to turn another colour. Often these are synthesized chemicals, but in this experiment we’ll make a natural one.
If you are sure what acids and bases are, you can read more here. Acids react with water and give away some of their hydrogen ions, while bases do the opposite – the react with water and receive hydrogen ions. Both kinds of chemicals are highly reactive, and so they can be dangerous. It’s always important to be careful and prepare the necessary equipment (goggles, gloves) to keep you safe.
The Experiment
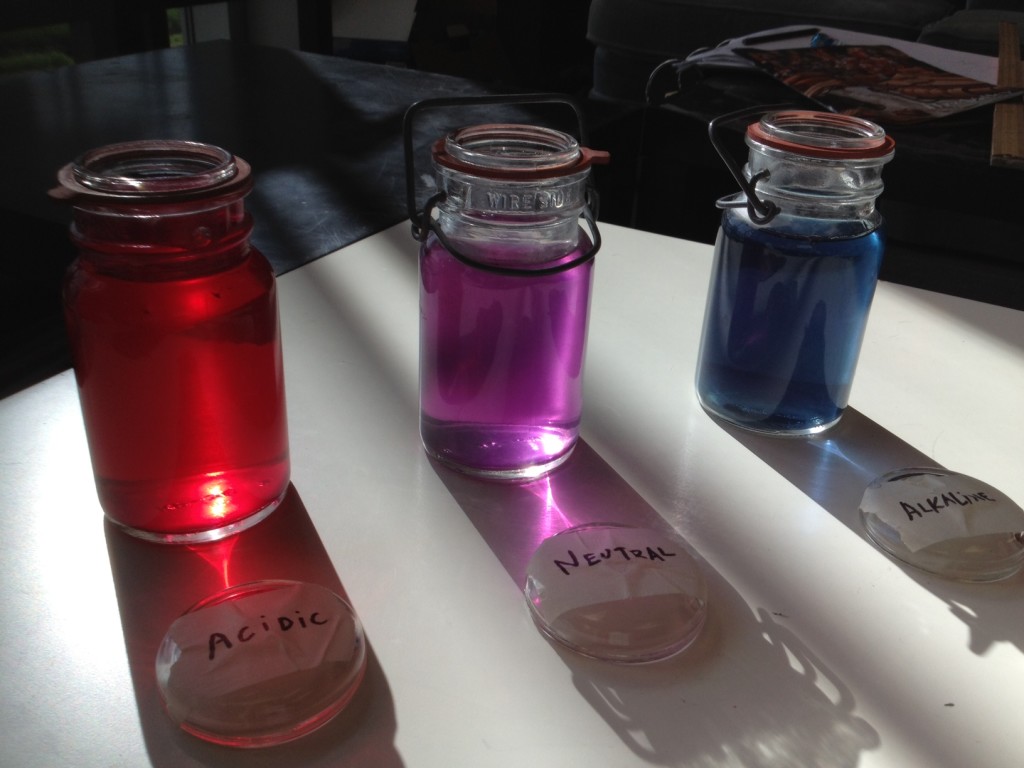
Red cabbage contains a unique chemical called anthocyanin that acts as a pH indicator. It starts as a purplish-red colour, but if it reacts with an acid it will turn pink, and if it reacts with a base it will turn blue. Pretty cool, huh? Let’s see how you can quickly and easily make this indicator and use it to test the pH of many different substances around you.
What to Use
- red cabbage (yes, we know it looks purple, but it’s called “red”!)
- water
- a medium sized pot
- a strainer
- a large pitcher
- a knife
- a cutting board
- clear plastic cups or bottles
- various liquids and chemicals in your home or school that you’d like to test
What do you think will happen?
As always, before you get going read through the experiment and think about what will happen. Which things that you will test do you think are acids? Which ones are bases? Write down your predictions so you can see if you were right at the end!
What to Do
STEP 1 – Making the pH Indicator
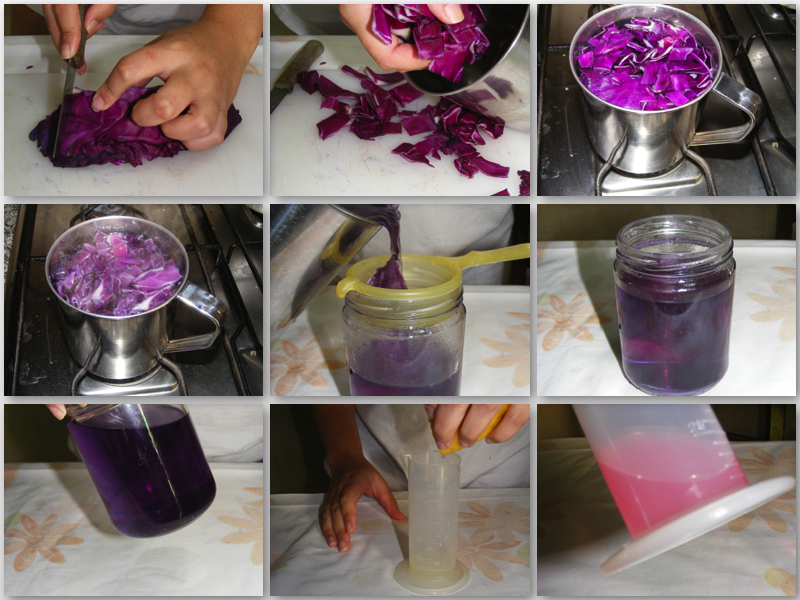
a) With an adult helping or supervising to make sure you are safe, cut up your cabbage into small pieces. You’re going to cook these and you can always eat them afterwards if you wish. If you want to test a lot of things, then you might want to use half of a cabbage, but if you’re only going to test a few things, then use less.
b) Heat up water in a pot on the stove. When it start to boil, toss in your cut up cabbage and let the whole thing boil for 2 minutes. Turn off the heat and set the pot aside to cool down.
STEP 2 – Preparing Your Samples
c) Set out some clear plastic cups or bottles and start adding the things you want to test to them. You don’t need to add too much, just about a tablespoon full will do. For example, try lemon juice, vinegar, any clear juice, the water from your fishbowl or swimming pool, etc.
If you want to test things like soap or shampoo that may have a strong colour already, mix a little in with water and remember the original colour.
If you want to test anything that’s dry, like a powder (ex. baking soda), you can also mix it with water first to make a solution.
d) Label the cups or bottles so you know what’s in each one.
STEP 3 – Run Your Tests
e) Once it’s cool enough to use, pour your indicator through the strainer into the pitcher. Keep the cooked cabbage chunks for eating any way you like! Pour about a tablespoon full of the indicator into each of your sample containers and see what happens. It’s easy to see the colours change if you put the cups/bottles on or against something white, like paper, a white wall, or a white table.
f) You’ll see that some of the things you tested change colour more strongly than others. Arrange your samples in order from very blue on one side to very pink on the other. This will show the order of strength of bases (blue) to acids (pink).
What Did You Find?
Were you surprised that some of the things you tested were acids or were bases? Did anything change colour when you didn’t expect it? Did you find anything neutral (pH7) that didn’t change colour at all? How did the colour changes compare with what you predicted?


